Showing posts with label Perfect Punches. Show all posts

Monday, 24 December 2012

Festive Trio

Hello Everyone

Three more Christmas Class projects for you today.

The first two are simple cards we made at my Christmas Stamp a Stack - simple designs, but effective. The top one could easily be changed up to make a card for any occasion. The papers are from the fabby Festival of Prints stack - also perfect for any time of year.


The gift box is a classic design made from a single sheet of A4 cardstock. I used the red Glimmer paper to give some sparkle and finished with a bow and Cherry Cobbler Bakers Twine.

Wishing a Happy Christmas to each and every one of you.

Love Elizabeth X

Saturday, 3 November 2012

Ssshhhh - I've got a secret!

Hello Everyone

Well if you are reading this on Saturday 3rd November, I will have left my lovely DH at home and gone off to European Stampin' Up! Convention in Mainz, Germany.

I will be posting some pictures when I get home. I am a proud Stampin' Up! Mummy as, for the first time, I am taking all 5 of my team with me. How exciting.

Now here is a secret I have been keeping.....I have been asked to present at convention for a second year! I am SO honoured to be asked although still nervous. Keep your fingers crossed for me!

Anyway, enough of the chat and on with the projects...!

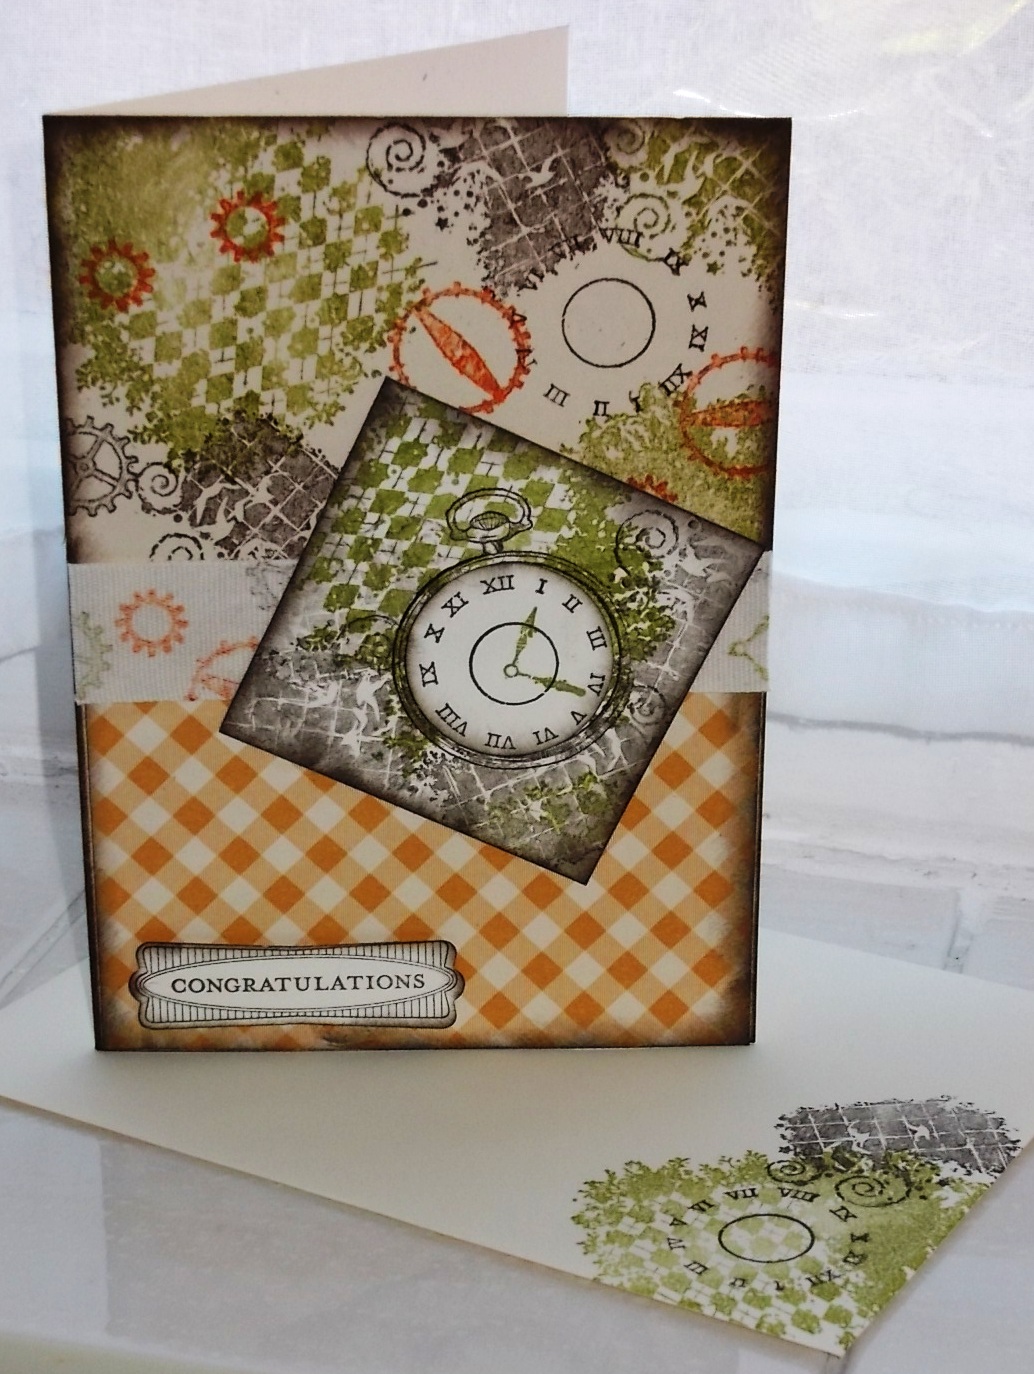
Clockworks was a stamp set that was high on my wish list when I saw the new Stampin' Up! catalogue. I could see at once it would make some great man cards - always tricky for me.

Here I used Old Olive, Early Espresso and Tangerine Tango ink and did some random stamping. I also stamped on the cotton ribbon to create a central border. The Designer Paper is from the Orchard Harvest set, which is in the Autumn/Winter catalogue.

The watch face fits perfectly with the 1 3/4" circle punch, so popping up the face is easy.


Now just to show that this stamp set works for us girls too - here is a feminie version of the card. The paper this time comes from the Patio Party and the ink colours I have used are Primrose Petals, Summer Starfruit and Basic Grey.

The greeting is from Curly Cute and don't you just love the new Vintage Faceted Designer Button on this one?


I hope you liked today's projects. I will be back from Mainz next week, with news and photos from Convention. See you then!

Love Elizabeth X


Tuesday, 23 October 2012

All About Betsy

Hello Everyone


Today is another combination of Betsy's Blossoms and the Apothecary Accents Framelits. I love the way you can use the same stamps and accessories and create such different looking projects.

Here I have stamped Betsy's flower and punched it out with the Blossom punch.  (I don't know who Betsy is - but perhaps she should be me - after all the Elizabeth stamp has retired - I could be Betsy...LOL)


I inked the edges of the flower and added a Basic Rhinestone. The background was done with the Betsy's Blooms Wheel. I used Raspberry Ripple ink on the Primrose Petal carstock. The leaf image also belongs to Betsy - and the sentiment is from Perfect Punches.


I punched Gumball Green cardstock out using the Apothecary Accent die - love how all those colours go so well together.

Well back soon with more - I think time for something festive on the next post!


Love Elizabeth  - or should I say Betsy! X

Tuesday, 27 March 2012

Happy Easter Everybunny!

Hello Everyone

Now I fell in love with this stamp set as soon as I saw it in the catalogue. It was October, but I couldn't wait to buy Everybunny - it is SUCH a sweet stamp set and could certainly be used at times other than Easter. When it arrived my DH heard me squeaking with delight as I coloured the images - even for a colouring-impared girl like me, the images were SO easy to colour.


Now we are approaching Easter, so I decided it was time to teach a cute project at my March class, so my ladies had time to create their own Easter gifts before the holiday.

This design was a variation on a treat bag designed by my convention roomie Hayley, (click on CONVENTION on my side bar to see some of her fabulous makes). She shared a pretty cardstock version of this design at a shoebox swap a couple of years ago - and it was just crying out for an Everybunny remake!

I chose to use designer paper from the Subtles Stack, so we made a range of pastel colours at class - they looked gorgeous. The ladies each chose which image to use, and whether to punch or cut out. We then used our punched scraps to make a little matching card.


We used the Large Scallop punch and the 13/4" circle punch to create a window and inside we attached a Small Cello Bag filled with chocolate eggs. We did a closure with narrow taffeta ribbon so the gift bag can be opened and re-closed.

So what are you making for Easter?


Love Elizabeth X

Saturday, 24 December 2011

Happy Christmas Everyone

Hello Everyone and Happy Christmas to each and every one of you

Today I am sharing some luxury Christmas tags that we made during our December classes. Mine are currently attached to gifts under my Christmas tree.

They have so many elements I am not sure where to start telling you about them. I will start with the die used to create the tag shapes - this is the new Two Tags die, which is another Big Shot favourite for me.


We used some lovely Crumb Cake and Cherry Cobbler Seam Binding ribbon and the beautiful Victoria Crochet Trim. Amongst the stamps are Tags Till Christmas, Perfect Punches, Four Frames, Everything Eleanor, Elizabeth and Petite Pennants.


I chose Cherry Cobbler, Very Vanilla and Naturals Ivory cardstock along with some matching Designer Paper from the Regals and Neutrals stacks to create these vintage looking tags.

Have a wonderful Christmas holiday and I will be back soon.

Love Elizabeth X

Thursday, 15 December 2011

Layering in Wisteria

Hello Everyone

Today's card features one of our In Colours, Wisteria Wonder. I started by stamping the super large Medallion background stamp in the Wisteria Wonder ink on the matching cardstock. Love that tone-on-tone effect.


Next I created some layers for my greeting. I put some Concord Crush cardstock through the Big Shot using the ever popular Top Note die. I then turned the die cut 90 degrees, and cut again to create the shape above. I layered with a couple of squares then a die cut circle made using the Perfect Pennants die and finished with the sentiment stamp from the Perfect Punches stamp set.

Hope you like this one. :)


Love Elizabeth X

Thursday, 23 June 2011

Remember the ice cream?

Hello Everyone


If you remember the ice cream projects I posted earlier this month, I promised to show you some more in the same colour scheme that went with the set.

I will start with the little umberellas made with the Scallop Circle die. Cute aren't they? If you want to know how I did the ice creams - scroll down to my Ice Cream Cards post.


In a similar colour scheme I did two more cards - this one uses Cheers for You, coloured using blender pens and ink pads - so much more easier than watercolouring for me! :)


The frames are Four Frames, punched with the Decorative labels punch and Perfect Punches, punched with the Scallop Circle punch.

Do you like the bow? No bow tying required here. I just folded a scrap of Pear Pizzazz Seam Binding ribbon into two loops and fixed it with a brad.


More use of the Top Note die on the inside - fabby when you use a dark base card.

Now one final project for the day...


All the other versions of this card I have done have been in blues and greens - more manly - but I thought why not in ice-cream colours. OK I know they are not traditional sail colours - but I like them! Hope you do too! 

Tuesday, 15 March 2011

Greenhouse Garden

Hello Everyone

Today I thought I would share this bright spring-like card with you today.

I designed it as something to teach as a Make & Take project for a charity event I did earlier in the month. I wanted something fairly quick and that could be suitable for beginners as well as experienced crafters.


For this type of project I always reach for Greenhouse Garden. It features two-step stamping and everyone who hasn't used this stamp set before is always delighted with how easy it is to create such pretty flowers.

The colours I chose were Pretty in Pink with Rose Red, Bashful Blue with Marina Mist and Certainly Celery for the card itself.

The sentiment is from Perfect Punches, which of course goes PERFECTLY with the Large Oval punch!

Hoping spring is just around the corner for you.

Friday, 24 December 2010

Happy Christmas Candles

Hello Everyone

My final Christmas project of the year - I can't believe Santa will be round so soon! Where did that year go?

Today I am sharing a stamped candle set that I made using Season of Joy, Contempo Christmas and Perfect Punches stamp sets.


If you have never made stamped candles before, it is easy to do. You stamp your image on tissue wrapping paper, cut out the images and place on the candle. Next to tightly hold them on to the candle using baking parchment. You then hold a heat gun over the image until the surface wax starts to melt - the tissue is then absorbed into the candle.

Watch out for your fingers - it is easy to burn them if you are not careful. All candles melt at different rates, so you will need to check as you go and re-heat if you can still see the tissue paper.

Wishing each and every one of you a very Merry Christmas and a Happy, Healthy New Year. X

Tuesday, 30 November 2010

Espresso Tree

Hello Everyone

Today I am sharing another Contemp Christmas project - I know I just can't stop using this stamp set!  I used the background stamp called Sanded to give some texture to the lovely dark Early Espresso cardstock.

The tree is stamped on Pink Pirouette cardstock and coloured using markers.


The sentiment comes from the Perfect Punches set - I love the way Stampin' Up! stamps fit exactly into the punches - it makes getting that professional finish SO easy.

Here is another version - this is a mini card we did as a Make and Take at my launch party. It features my favourite new colour - Cherry Cobbler.


Hope you like - back soon with a non-festive offering!

Wednesday, 24 November 2010

More from the Colour Coach...

Hello Everyone

My third class card this month was also inspired by the Colour Coach. I am really enjoying trying new colour combinations.

I thought we would start making thank you cards this month - you know you are going to need them at Christmas time!


I looked to see what colours work well with my new Daffodil Delight ribbon and ink and found it would work with my favourite colour Cherry Cobbler - whoo hoo!

This card uses a stamp set that has been gathering dust in my stamp drawers, and I really don't know why because I love it! It is called Simply Said and has some lovely sentiments as well as the 2 Step Stamping flowers.

The punched Thanks sentiment on this card comes from Perfect Punches, which works perfectly with the small oval and scalloped oval punches.

I hope you like it.

Wednesday, 10 November 2010

Gift Card Holder

Hello Everyone

Today's project sees me back in my colour comfort zone. I just adore Cherry Cobbler and in goes so well with Very Vanilla and Crumb Cake ink.

This design was based on a project from Dawn's Stamping Studio, but I changed the stamps and colours to fit in with the goodies I had. 


The vanilla folder lifts up to hold the gift card and then slides in to the Cherry Cobbler holder. I used a tiny tag and lots of daubing around the edges of the folder. The ribbon is Very Vanilla grossgrain.

I think this is one of my favourite Christmas projects this year. Hope you like it too.

Tuesday, 12 October 2010

How cute are these?

Hello Everyone

Today I am sharing such a cute project. These handbags, (purses for those reading in the U.S.), are from a template by Becki Roberts. I have made some changes including the tab closures with a bit of bling in the form of a diamonte brad.


They are made in Bashful Blue cardstock, with the images, from Greenhouse Garden, stamped in Baja Breeze. The sentiment is from Perfect Punches and attached to the bags with Early Espresso ribbon.


I haven't got any co-ordinating buttons for this project, so I made some with punched circles of Baja Breeze cardstock, coated in Crystal Effects.

I love my handbags - hope you do too!