Thursday 27 December 2012

Fabric Paper Snips Holder

Hello Everyone

Today's project is one that I totally CASED from a sample I saw at Stampin' Up! leadership training. I am a total clutz when it comes to sewing, so always love to see a fabric project I can make without using a needle and thread!

This is a perfect holder for my Stampin' Up! Paper Snips, made with the Petal Cone Die.


I used multipurpose adhesive sheets to attache the fabric to the carstock before cutting with the die. I decorated with ribbon and Basic Rhinestones.

Why not have a go making a fabric project yourself this week?

Love Elizabeth X

Monday 24 December 2012

Festive Trio

Hello Everyone

Three more Christmas Class projects for you today.

The first two are simple cards we made at my Christmas Stamp a Stack - simple designs, but effective. The top one could easily be changed up to make a card for any occasion. The papers are from the fabby Festival of Prints stack - also perfect for any time of year.


The gift box is a classic design made from a single sheet of A4 cardstock. I used the red Glimmer paper to give some sparkle and finished with a bow and Cherry Cobbler Bakers Twine.

Wishing a Happy Christmas to each and every one of you.

Love Elizabeth X

Wednesday 19 December 2012

Merry Medley Votive

Hello Everyone

Today's project looks even more pretty in the dark! It is a votive made for a battery candle - don't use a real one or the health-and-safety police will be knocking on my door. LOL

I made it using an empty pot that contained Stampin' Up! brads. I took some Vellum cardstock and stamped using the Merry Medley hostess stamp set with snowflakes and Christmas greetings. I think rolled the Vellum so it fitted inside the bottom of the brad pot and secures with a dot or two of Tombow adhesive.

The lid went on the top to hold the Vellum secure.


I decorated using punched circles and a Basic Pearl for the top and the Dotted Scallop Ribbon Border punch to go around the pots. You could also use ribbon for this element.

I hope this has given you an idea for your leftover pots!

Love Elizabeth X

Saturday 15 December 2012

Merry Mini Christmas

Hello Everyone

Have you got the Merry Mini Punch Pack from the Stampin' Up! Autumn/Winter catalogue? I love punches and had to have this cute little trio. A star is useful all year around and the bauble can make petals to form a tiny flower - but they come into their own at Christmas time.

My first sample for you is a CASE from the catalogue. I love the sparkle from the Red and Champagne Glimmer paper.


Here is another example, which we made at a recent Christmas stamp a stack. It was a quick and easy card to make - which is good when you are making lots for the festive season. The white layer here is cut with one of the Window Frames Collection dies.

 
Hope you like today's punchy projects.


Love Elizabeth X

Wednesday 12 December 2012

VIDEO Trimmer and Gift Card Holder

Hello Everyone

So excited! My new trimmer from Stampin' Up! arrived today so I had to show it to you...


So many of us give gift cards at this time of year, that I always try to design a new one for my class ladies. We made this one during our November classes.

This is how it looks from the outside. We used Riding Hood Red for our outer holder and stamped using images from Polar Party. The greeting is from Itty Bitty Banners.


As you pull out the inner holder, you can see more of the Polar Party trees. We stamped them in Stazon, coloured with markers and did the stars using the fabby Gold Stampin' Dazzle marker from the Autumn/Winter catalogue. The tab is made using the Decorative Label punch.


As you open the Very Vanilla holder inside, it reveals a little holder for your gift card or money.


I have used this sort of design for invitations before, but I think it works well as a gift card holder - what do you think?


Love Elizabeth X

Saturday 8 December 2012

VIDEO - De-mounting Stamps & More Petite Purses

Hello Everyone

Two things today - first I have a tutorial video, a special from my SIL Sally and also my Class 2 ladies. They wanted to see how to de-mount wheels and wooden stamps and make them into Clear-mount stamps - their wish is my command...


You know I have been enjoying using the Petite Purse die - and these project show how much fun I have been having!

The first is a mock croc effect, done with Versamark and clear embossing powder and finished with a beautiful Antique Brad. The handle is covered in Raspberry Ripple Ribbon for a luxury touch.

The middle project is a school back-pack. I am so proud of the little pencils I made to go in the side pocket. It would be a great little teacher gift filled with chocolates or stationery bits and pieces.


But the last one is my personal favourite - let me show you a close up.....how cute is this little handbag?!

I started with some of the stunning embossed Natural Composition Speciality Paper - it is like a cardstock it is so heavy-duty. After die cutting I sponged over the paper with Soft Suede ink the rubbed over with a tissue. The embossed areas resisted the ink giving a stunning effect.


I used the tiny Scallop Circle punch to make the front decoration and used a Neutrals button tied with Bakers Twine for the closure. The corners were made with a circle punch, snipped and folded around to fit.

I stamped some text on Very Vanilla carstock, punched with the Jewellery Tag punch and daubed with more Soft Suede ink.

The handles are attached with brads from the Vintage Trinkets collection - you can't see in this photo, but they are like tiny buttons. And I even coloured four Basic Pearls with a sharpie marker to make little feet.

Making this was a labour of love - and I am delighted with the outcome. Hope you like it too.

Love Elizabeth X

Tuesday 4 December 2012

VIDEO Altered Clothes Pegs and Petite Purse with Viola's Lace

Hello Everyone

Today I am sharing two things. A cute handbag project and my first ever YouTube video. The video features a project I showed a week or so ago - altered clothes pegs. I would REALLY like your feedback on this one. Would you like me to include more tutorial videos on my blog? Do you have any comments, requests or suggestions? Any feedback positive or negative very welcome.

So here it is....


One of my favorite new dies from the new Stampin' Up! Catalogue is the Petite Purse. It easily makes a sweet little handbag, just the right size for a mini gift or a couple of chocolates.

I made these recently as swaps at my upline's team training event. They are made using Naturals White cardstock - and the buttons are also die-cut card - made with the Sweet Buttons Embosslit die. The thread is drawn in with a White Gel Pen.


 However, my favouite part of this project is the lace...it looks so real you want to reach out and touch - but actually it is a Stampin' Up! wheel called Viola's Lace.

I de-mounted the wheel image so I could use it with a clear mount block, (love the fact that Stampin' Up! in Europe now carry the Clear Mount Cling Foam). I even stamped the handle with the lace stamp too!


I really enjoyed using this die, and will be back with some more samples using it in a few days. In fact I also plan to make some in the Be of Good Cheer Designer Paper to use on my Christmas table!

Back soon with more for you...

Love Elizabeth X

Saturday 1 December 2012

Christmas Lodge Step Card

Hello Everyone

December is here already - where did the year go? But December means Christmas so a good time to share a card I taught at class last month.

This is a step card, which we have done before, but I couldn't wait to make on with the beautiful Christmas Lodge stamp set.


We used the thumping technique to create the Christmas tree - love the effect of the Garden Green on Always Artichoke - then we stamped the Lodge in Early Espresso and used a Blender Pen to drag some ink and colour the lodge everywhere where snow hadn't settled.

We added some sparkly snow with Dazzling Diamonds.


At the class I showed a different design, using the Polar Party stamp set.


So which one do you prefer?

Love Elizabeth X

Wednesday 28 November 2012

Quick and Pretty

Hello Everyone

Just a quick post today. Have you noticed the Festival of Prints Designer Paper Stack in the Autumn/Winter Seasonal Catalogue from Stampin' Up!

This is a great little paper stack - each sheet of lovely double sided paper is just the right size to cover the front of a card and you get 48 sheets for just £6.25.

Here is a cute project I made to show some of the designs. I covered wooden clothes pegs with 1/2" strips of the paper, then I used stamps from Merry Medley for the greetings. The ribbon is narrow taffeta in Read Red, Old Olive and Very Vanilla.


I don't know if you can see on the photo, but I finished with a spritz of Shimmer Mist for added sparkle.

Hope you like todays quick and easy project.

Love Elizabeth X

Sunday 25 November 2012

Clockworks Cards

Hello Everyone

Two quick cards today, both made using one of my favourite stamp sets from the new big Catalogue - Clockworks.

This one was designed from elements that were supposed to be for a scrapbook page. I had fun stamping on all the little cardstock flags.


This next one was inspired by the Colour Coach - a fabby tool that gives you great colour combinations that you may not have thought of.

The DSP is from the Patio Party pack and the Primrose Petal carstock is stamped with Raspberry Ripple and Basic Grey ink.

Hope you like today's projects

Love Elizabeth X

Thursday 22 November 2012

Christmas Cuties

Hello Everyone

Here a couple of Christmas project ideas. Last year we made 5 Christmas tags as part of one of my classes and I loved the colouring. I decided to make an updated pair of tags using some of our lovely new goodies.

Here I have used the new Cotton Ribbon and stamped stars on it. I used Cherry Cobbler Tulle and stamped with Scensational Season and Tags Till Christmas.


Here is another updated project. My lovely downline Nina gave me this cute little box last year which she had made using the Candy Wrapper Die. I added some new Designer Series Paper and the greeting from Merry Moments. I finished it with White Bakers Twine and a Rhinestone.


Hope you liked today's festive projects.

Love Elizabeth X

Monday 19 November 2012

Paper Piercing Project

Hello Everyone

Paper Piercing has never been so easy now that we have a whole range of piercing templates in the new Stampin' Up! Catalogues.

With our new large Stampin' Pierce mat and Paper Piercing Tool, you can outline and enhance punched, stamped and die cut images.

Here I used the Festive Pack from the Autumn/Winter catalogue to create a Christmas Card.


As well as templates for all the Ornament Keepsake stamps and framelits, this pack includes the Labels Collection Framelits and Window Frames Collection.


I couldn't get it to show on the photo, but this card is also spritzed with Shimmer Mist for a sparkly finish.

Hope you like!

Love Elizabeth X

Friday 16 November 2012

Clockworks Gift Pack

Hello Everyone

Today's project is something I started at Stampin' Up! leadership training back in September - but they had just given us our first copy of the new Stampin' Up! catalogue - so we were rather distracted and I finished up this project when I got home.

This set is made with four Notecards & Envelopes, stamped and wrapped in Vellum Cardstock. I decided to stamp the vellum to match the cards before scoring in using the Simply Scored tool to create a vellum envelope.


So this is what is inside....all made with the Clockworks stamp set.


I made a variety of co-ordinating designs and added different greetings. (From memory, I believe the design we were given to copy was similar to the one top right).  I think this set would make a great gift. What do you think?


Love Elizabeth X

Tuesday 13 November 2012

Core'dinations Ideas for You

Hello Everyone

Today I am sharing a couple more ways of using the Core'dinations Cardstock with our embossing folders.

The first card below I used the Beautiful Wings Embosslits, the second I used the Scalloped Hearts Embosslit and on the last one the Elegant Boquet Embossing Folder. I think the third one is my favourite here.


My next Core'dinations project is a retirement card. Inspired by a Halloween card made by lovely demo friend Elaine, this is a garden shed made with the Woodgrain Embossing Folder.

I did the roof with the Scallop Border Punch in Basic Grey cardstock and daubed the edges with Early Espresso ink.


The door piece is layered on plain Espresso cardstock and the hinges are made with the Word Window punch and Mini Brads.

Hope you like it - and thank you Elaine for the inspiration. X


Love Elizabeth X

Saturday 10 November 2012

Lovely As A Tree - two ways.

Hello Everyone

I thought I would share a couple of Christmas cards today. I know if you are making a big stack of Christmas cards, you need to keep it simple. So here is a quick and easy one for you!

The image is from Lovely as a Tree and the greeting from Teeny Tiny Wishes. The card is Gumball Green and the layer is in Raspberry Ripple.

I finished with a bit of Dazzling Details to add some bling.


Now for a stepped up version - here I layered up Lucky Limeade and Early Espresso and Whisper White. I stamped the same tree image using Garden Green and then put all three layers through the Big Shot with the Holiday Frame Embossing Folder.

I then stamped the top of the tree again and punched out with the XL Oval Punch. I added baubles in real red ink on the popped up portion.


Which one do you prefer?

Love Elizabeth X

Monday 5 November 2012

European Stampin' Up! Convention 2012

Hello Everyone

Just back from Stampin' Up! Convention in Mainz, Germany. 800 demonstrators getting together to stamp, inspire one another and party! What could be better?

Well for me, what was better this year, was sharing the experience with my fabulous team. We are called the Dazzling Dreamers, (because if you can dream it, you can do it), and they all came along to enjoy the fun.

Below you can see me, Carolyn, Sara, Tracey, Nina and Jan. We had an AMAZING time together. And if you want to join us next year in Manchester, you can join our team - we would love to welcome you along. (Just click on Join My Team above for more details).


We were 'wow'ed, inspired and entertained in style. Here is our CEO Shelli Gardiner on stage. We all loved her presentations and projects.


I gave a presentation with Sally-Jo Houghton and Charlotte Harding to the UK demos, which was a bit scary - but everyone said we did a good job!

In the evening we went out to eat - the lovely Rhoda from the Shetlands, (at the front) and an adopted Dazzling Dreamer Nichola joined us along with my upline Amanda - who was taking the photo here!


I will finish today by showing one of my two swap projects - a card featuring the Field Flowers stamp set and using our fabby new 2.5" circle punch.


Love Elizabeth X

Saturday 3 November 2012

Ssshhhh - I've got a secret!

Hello Everyone

Well if you are reading this on Saturday 3rd November, I will have left my lovely DH at home and gone off to European Stampin' Up! Convention in Mainz, Germany.

I will be posting some pictures when I get home. I am a proud Stampin' Up! Mummy as, for the first time, I am taking all 5 of my team with me. How exciting.

Now here is a secret I have been keeping.....I have been asked to present at convention for a second year! I am SO honoured to be asked although still nervous. Keep your fingers crossed for me!

Anyway, enough of the chat and on with the projects...!

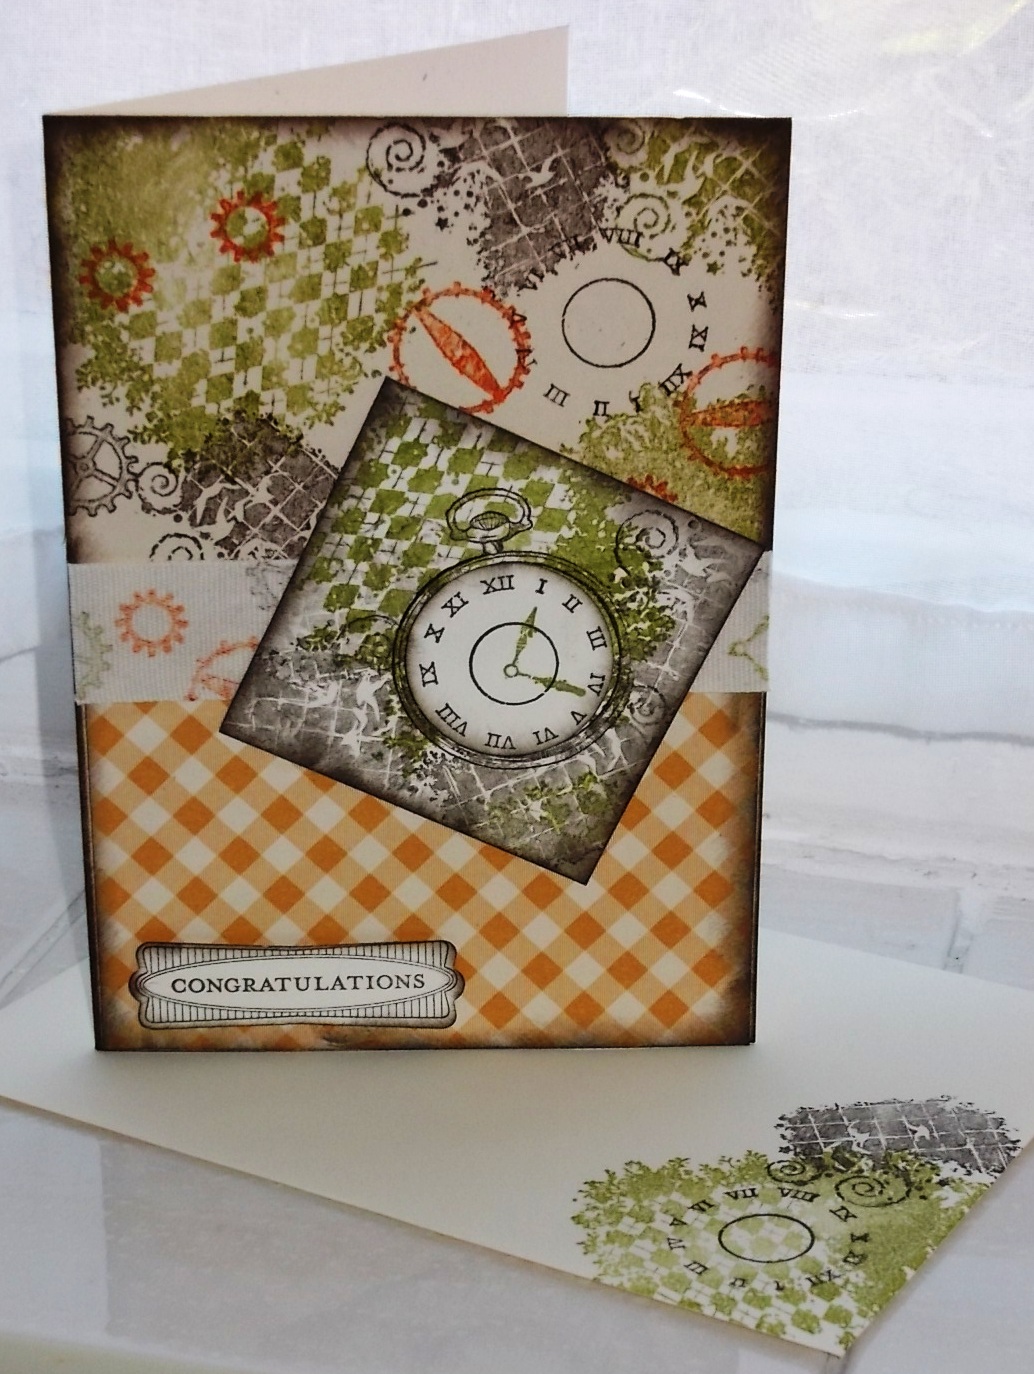
Clockworks was a stamp set that was high on my wish list when I saw the new Stampin' Up! catalogue. I could see at once it would make some great man cards - always tricky for me.

Here I used Old Olive, Early Espresso and Tangerine Tango ink and did some random stamping. I also stamped on the cotton ribbon to create a central border. The Designer Paper is from the Orchard Harvest set, which is in the Autumn/Winter catalogue.

The watch face fits perfectly with the 1 3/4" circle punch, so popping up the face is easy.


Now just to show that this stamp set works for us girls too - here is a feminie version of the card. The paper this time comes from the Patio Party and the ink colours I have used are Primrose Petals, Summer Starfruit and Basic Grey.

The greeting is from Curly Cute and don't you just love the new Vintage Faceted Designer Button on this one?


I hope you liked today's projects. I will be back from Mainz next week, with news and photos from Convention. See you then!

Love Elizabeth X


Thursday 1 November 2012

A Taste of India

Hello Everyone

Today I am sharing a simple covered box. This box needed to be made pretty and I thought the Floral District Designer Series Paper was just the thing.

I love the exotic feel of this paper - to me it reminds me of rich Indian colours, so using it with the large Apothecary Accents die, which reminds me of the Taj Mahal, was just perfect.

You can see I have used the Dazzling Detail to add some silver bling.


I think this would make such a pretty gift box - if I can only bear to part with it. :) 


Back in a couple of days with two lovely projects.

Love Elizabeth X

Tuesday 30 October 2012

Core'dinations Tree

Hello Everyone

In an earlier post, I showed you the stunning Holiday Frame Embossing Folder used with the Core'dinations card stock and here is another card made using the same products. I love how just gently sanding the frame shows the pale colour though and gives a very vintage feel to this Christmas card.

I felt I had to bling it up with pearls, Tulle ribbon and Seam Binding ribbon - both in Crumb Cake.


Recently I got another embossing folder from the Autumn/Winter catalogue - this time the Woodgrain one - well I had to have a play at once...so I created a tree!

I used Scallop Circle punches and the largest of the Boho Blossoms in various greens and daubed the edges with Always Artichoke ink. The flowers are made using the Itty Bitty Punches.


I love how this card came out - it's like a childhood drawing!

Love Elizabeth X

Friday 26 October 2012

A Happy Accident

Hello Everyone

Today I am sharing a project I started at a team training event with my upline Amanda back in the summer.

One of my lovely downline, Nina, was poorly so I offered to make all her projects for her. Well this was an all day training and Amanda really packs those projects in! Tracey, another of my downline, helped me, but although I got all Nina's projects made, some of mine came home only half completed.

Now this happy accident meant that I could convert this beautiful gift box design and cover it with Christmas trees.


I used the Scentsational Season tree and star stamps, coloured just a few of the baubles with a Real Red marker and then topped them with Crystal Effects for a glossy finish. I love how this looks. The other trees are cut using the Holiday Collection Framelits tree die, using some of the Festival of Prints DSP stack.


Sometimes projects are just ment to be - thanks to Amanda, Nina and Tracey for this one!

Love Elizabeth X

Tuesday 23 October 2012

All About Betsy

Hello Everyone


Today is another combination of Betsy's Blossoms and the Apothecary Accents Framelits. I love the way you can use the same stamps and accessories and create such different looking projects.

Here I have stamped Betsy's flower and punched it out with the Blossom punch.  (I don't know who Betsy is - but perhaps she should be me - after all the Elizabeth stamp has retired - I could be Betsy...LOL)


I inked the edges of the flower and added a Basic Rhinestone. The background was done with the Betsy's Blooms Wheel. I used Raspberry Ripple ink on the Primrose Petal carstock. The leaf image also belongs to Betsy - and the sentiment is from Perfect Punches.


I punched Gumball Green cardstock out using the Apothecary Accent die - love how all those colours go so well together.

Well back soon with more - I think time for something festive on the next post!


Love Elizabeth  - or should I say Betsy! X

Saturday 20 October 2012

Stamped Candle and Gift Bag

Hello Everyone

Today's two projects could be a matching set - although I only noticed when I was photographing them how well they went together! 

I love to do stamped candles and included the technique in a recent class and some workshops earlier in the year. So lots of my lovely ladies will, I am sure, be making candles for Christmas gifts - no pressure girls! LOL

This candle features the two stamps from Merry Medley, which is a hostess stamp set in the Autumn/Winter catalogue. (Remember to book a party if you want it!). As well as Christmas stamps it has Halloween, Birthday, Valentines, Friendship, Flowers and matching greetings. There is a little Scallop Circle punch that matches it too!

I made a matching tag and put the candle in one of our Medium Cellophane Bags and ties with ribbon and Bakers Twine.


The bag is made from Early Espresso cardstock and covered with paper from the fabulous Festival of Prints DSP stack. It is only £6.25 for 48 sheets of double sides paper the right size to cover a card front or - as in this case - more than enough for both sides of this little bag.

The image on the front is stamped with the Layered Labels stamp set. I stamped it twice on Whisper White cardstock, once in Marina Mist and once in Midnight Muse. The sentiment I punched out with the XL Oval Punch and I layered it over the background, which was cut with the Apothecary Accents Framelits.

And if you think I attached the label with brads - nope - those are dots of Dazzling Details! (See previous post for further gushing on this fabby product! LOL).

Back soon with more gushing! :)

Love Elizabeth X

Wednesday 17 October 2012

Dazzling up Christmas

Hello Everyone

We are getting festive today with some Christmas Tags made from the Scentsational Season stamp set. I have really enjoyed using these stamps, especially as they have the matching Holiday Collection Framelit dies to cut them out.

If you buy these stamps and framelits together, the bundle costs 15% less that buying them separately - what a great deal!


Here is a close up of the tree...do you see the little silver baubles I have created? They are so easy to do with the Dazzling Details Silver Sparkle. It is like having the dense shine of Dazzling Diamonds in a glue with a super-fine tip that makes bringing sparkle to your projects simple.


The Dazzling Details is a bargain at only £2.25 and is going to be bringing bling and sparkle to lots of my Christmas projects.


Love Elizabeth X

Sunday 14 October 2012

Betsy's Bird

Hello Everyone

Another couple of Betsy's Blossoms cards today. This stamp set is so beautiful to use. Did you know Stampin' Up! have updated their ink pads to give even better ink coverage with just a couple of taps of the stamp? These new in colours are the ones I have in the new design and it certainly makes getting that beautiful crisp image even easier than before.


I thought I would do a matching tag to go with this card...


...this time I used the Bird Punch to create the bird and punched out the wing image. The greeting comes from Teeny Tiny Wishes and I used a snip of the new 1/4" Stitched Grossgrain Ribbon tied with some Linen Thread to finish the project.

Back with more from our new catalogues soon.

Love Elizabeth X