Thursday, 23 June 2011

Remember the ice cream?

Hello Everyone


If you remember the ice cream projects I posted earlier this month, I promised to show you some more in the same colour scheme that went with the set.

I will start with the little umberellas made with the Scallop Circle die. Cute aren't they? If you want to know how I did the ice creams - scroll down to my Ice Cream Cards post.


In a similar colour scheme I did two more cards - this one uses Cheers for You, coloured using blender pens and ink pads - so much more easier than watercolouring for me! :)


The frames are Four Frames, punched with the Decorative labels punch and Perfect Punches, punched with the Scallop Circle punch.

Do you like the bow? No bow tying required here. I just folded a scrap of Pear Pizzazz Seam Binding ribbon into two loops and fixed it with a brad.


More use of the Top Note die on the inside - fabby when you use a dark base card.

Now one final project for the day...


All the other versions of this card I have done have been in blues and greens - more manly - but I thought why not in ice-cream colours. OK I know they are not traditional sail colours - but I like them! Hope you do too! 

Sunday, 19 June 2011

Gebera Card

Hello Everyone

The idea for this card is CASE'd from the lovely Sara - not the first time she has inspired me! I added a vellum cardstock vase and chose a Pirouette Pink and Pretty in Pink colour scheme.


To make this card you need the Big Shot, (have you noticed I have an addiction LOL), and the Flower Daisies #2 die. You need three of the large daisies and three small ones. I daubed the edges before fixing to a hidden circle punch.

I used the Mat Pack to do a spot of paper pricking as you can see.


I love using the Top Note die to make inserts for the inside- they make your cards very luxurious!


In this close up you can see the the punched vase and the tiny tag.

Hope you like!

Thursday, 16 June 2011

Concord Crush Trio

Hello Everyone

Another three sample cards from me today - this time all based on the yummy Concord Crush cardstock and ink...


All these cards feature stamp sets from the Stampin' Up! Mini Catalogue - which you can see in full by clicking the link at the top of this blog.

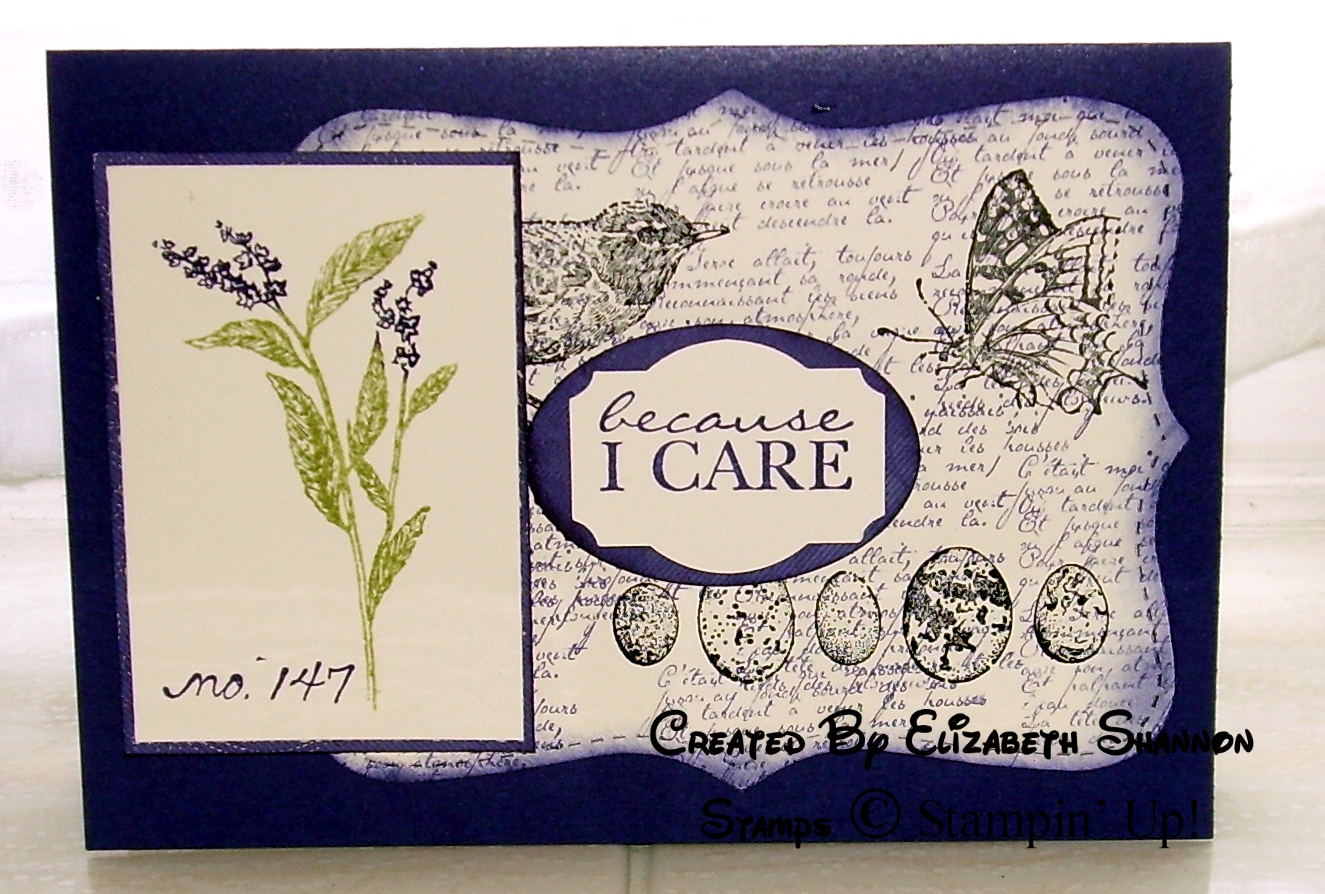
The first one is the stamp set I fell in love with as soon as I saw it. It is called Nature Walk and has a feel of botanical drawings...


I started by cutting a Whisper White top note shape with my trusty Big Shot stamped all over using the script stamp from French Foliage, (more of that set coming up). I stamped the eggs, bird and butterfly images in Basic Grey ink and used the marker to stamp technique to stamp the flower.


This card started with the frame from the Notably Ornate stamp set. The topper is done with the frame from Four Frames, which matches the Decorative Label punch. The three little images are from Itty Bitty Bits, which also go with a trio of matching punches.


Now for my favourite stamp set from the Mini Catalogue - French Foliage. You know I almost didn't buy this set - it was springtime and it seemed such an autumn set - but I am SO glad I ended up getting it. It is the most forgiving set I have ever stamped with - you just stamp and everything looks fabby! And it works in every colour too - which you wouldn't imagine.

I used a little Newprint DSP and cut it with the Top Note die. I also cut several circles with the Circle #2 die.
I then used the back of the smaller circle in each case to create a mask and daubed to make a frame. Then I stamped to my hearts content with those lovely French Foliage images.

Hope you like my trio of cards - which is your favourite?

Monday, 13 June 2011

Scallop Circle Card

Hello Everyone

OK - back to the pretty after my last grundgy post. More Springtime Vintage projects from my sample displays. Now I learned how to make this card from Teri Pocock, a very talented crafter who I have mentioned before.


Using the scallop circle die, you half cut the front of the card and fold back to create the fancy fold. Then time for lots of layers of DSP and cardstock...

The flower is made with the Fun Flowers die - which I just love - cut and embossed using the Big Shot. I used Whisper White cardstock and daubed with Certainly Celery ink.


This card gives such a great 3D effect - I loved learning how to make it.

Now I am off to enjoy myself - it is my birthday today!

Thursday, 9 June 2011

A Pirates Life for Me!

Hello Everyone

Well after my last two cute and girly posts, I though I would do something a bit more grundgy. Now my teacher for distressing and grundgyness of all kinds is my lovely upline Amanda. It is so far from my comfort zone, but she has helped me to improving my grungability.

Amanda celebrated two events in May, firstly her birthday and secondly her promotion to Gold 1 with Stampin' Up! So as a little gift I took one of my very neat scrapbooks and grundged it to blazes!

Here is how it looked non-grundged...


Now Amanda has another love - not just Stampin' Up! - she also loves Pirates - especially in the form of Captain Jack Sparrow. I can relate to her there and took lots of photos when I went to Disneyland Paris last year - they had an excellent Jack in the parade! So here is the scrapbook all done for Amanda...


See that dirtied up scrapbook? I did that! LOL. I used the Distressing Essentials Kit from SU! and went for it. OK - here is the next page...


As you can see I used the stamp set Beware Pirates, which was perfect for this project. I used the round file to curl the paper on the notice there...ok next page...


Now I left these pages blank as we are off to Disneyland Paris for Stampin' Up! convention later this year and I am sure Amanda will find time for a meet and greet with a pirate or two! The map comes from the Newsprint DSP.


Here he is - the man himself!


I had to include some pieces of eight and pirates gold! The coins are embossed using the Vintage Wallpaper die and double heat embossed using gold embossing powder. I also added a pile of glass glitter for even more sparkle from the hoard!


Hope you enjoyed my brush with grundginess...so you know the words - it's time to sing - Yo Ho, Yo Ho, A Pirates Life for Me!

Sunday, 5 June 2011

Anyone for Ice Cream?

Hello Everyone

Another cute selection from my party display today. I had SO much fun making these cards using the Big Shot to create embossed textures. First one that I pretty much CASE'd from many locations - my addition was using the owl punch to make the very top of the ice cream.


I also made a cherry and a chocolate flake! The cone is made with the Square Lattice embossing folder and the background is Blushing Bride Designer Series Paper.

Now this one I dreamed up myself. I always remember my Gran serving deserts in little cut glass bowls and I thought it would be fun to try to make one using Window Sheet from Stampin' Up! and the Vintage Wallpaper embossing folder.

Now this is hard to photograph - but see what you think!


Good idea eh? Gran would be proud of me!

The chocolate sprinkles are stamped using the Confetti circles stamp, the strawberry is from Tart & Tangy, and the sentiment is from Crazy for Cupcakes.

Now I didn't want to stop there - with ice cream in mind, I decided to create an Ice Cream Parlour -  no I don't do anything by halves! LOL

I started by googling images of Ice Cream parlours from the 1950s to get some inspiration. I love the deco feel and it went well with my In-Colour theme. OK - here it is...


I know! Isn't this the cutest thing I every made? :D  I actually found a box in my stash that had those rounded ends, which was just the shape I wanted for my counter. I covered it in DSP and used the lid to create the counter top.

I did the edge with the scallop border punch and added a length of 1/4" taffeta ribbon to give a neat edge. The tiny ice creams were fun to make. I stamped the top of the cupcake images from Crazy for Cupcakes to create the ice cream, then cut mini versions of my big cone. The ice cream cone stands are scraps of Window sheet, punched with the scallop circle punch and scored across the bottom. I was really pleased to think this up! The menu is the Curly Label punch and the bowls of sprinkles are a one inch circle punch, snipped around the edge. I filled them with Crystal Effects and sprinkled on glitter and 'owl eye' punches in red for the cherries.

Here is a close up of the counter at Elizabeth's Ice Cream Parlour...


Now there are a few more projects that went with this set, which I will show later - including a closer look at those cute umbrellas - but I hope you like my Ice Cream display. 


So - who is for a chocolate chip cone?

Wednesday, 1 June 2011

Springtime Butterflies

Hello Everyone

Today I am sharing some more samples that I made for my Customer Thank You Party last month. I just LOVE the Springtime Vintage paper. It is so pretty.

This Top Note quilt card really shows it off doesn't it? I Used the Beautiful Butterflies die too to create that little butterfly.

And talking of butterflies - one of my favourite displays was my box of butterflies - what do you think?

All made again with the Beautiful Butterflies die and a mixture of the Springtime Vintage DSP and co-ordinating cardstock stamped with the swirly leaf image from Vintage Vogue.

The ones on the left are on pegs and were displayed on a topiary frame at my party. Like to see a close up?


As you can see I have used 3 layers from the die, daubed the edges with ink and added 1/4" taffeta ribbon to the centres with a bit of rhinestone bling to finish.

They are attached chopsticks and I have tied various ribbons under them. Do tell me what you think!

(Oh and by the way - click on the June & July Offer tab at the top for a great deal this summer!)