Sunday 30 May 2010

Colour Renovation

Hello Everyone
...

So today's post is all about the Color Renovation, (or colour as we say here in the UK)

...


After much research Stampin' Up! have decided to re-organise their colour families. This means that we will be losing some colours, but gaining to scrummy new ones to replace them.
...
In the UK, we will be saying farewell to the colours on the left in September - until then you will still be able to get hold of your favourites, (stock levels permitting).
...


Click on the colour charts to see the full size version.

...

So - I here you asking - where are the new colours? Well they fit right in with the colours we are keeping and are sorted into four collections - brights - neutrals - regals & subtles.
...
We thought we would have to wait until October before we got to play with them - but SURPRISE - we are able to order a whole range of goodies in three of the new colours starting in May.
...
The new colours we can get RIGHT NOW are called
  • Soft Suede - a stunning brown with hints of green
  • Rich Razzleberry - a warm deep purple/pink
  • Melon Mambo - my favourite! A stunning tropical pink.
As well as the inks and cardstocks which will continue in the October catalogue, while stocks last we can also get co-ordinating Designer Papers, printed window sheets, (transparencies), and beautiful spotty ribbons - 13.7m long.
Let me know if you wish to place an order.
...Some are 'while stocks last' so be quick if you want them, but the inks and cardstock packs will be in the new catalogue.
So - ready to see a project using ALL the newly available colours? This is the swap I made for my quarterly training meeting.
...
I used the medallion background stamp, which I think looks great in the Rich Razzleberry! The flower is created using the Flower Accent and Dot,Dot,Dot stamps from the mini catalogue using the 'kissing' technique.
Hope you like!

Thursday 27 May 2010

Class Photo!

Hello Everyone

A little earlier this month I showed you one of the projects we made at classes this month. All my lovely class ladies have done a wonderful job with them - I am so proud of them!
...
I do four classes a month - these are my 1st Wedneday of the month ladies. From left to right Vera, Joyce, Jennifer, Me, Sara, Tracey & Jan.


During our 2 hour class we make 3 project - one is always a 3D. The birdhouse was quite a challenge, so I did lots of preparation and then we did cards that were a little more simple than usual - so we still managed all 3 on time.


I will show some close ups of the star card soon and give some details - if you want to see a close up of the bird house and greenhouse garden card, scroll down a few posts and they are there.

Hope you like :)

Monday 24 May 2010

Welcome Home House

Hello Everyone
...
My May classes featured a birdhouse, which you can find if you scroll down my blog. (The original design was inspired by a Stamp with Us! project). While I was making up my sample, I decided to make another version just for fun. Even though much of my stamping is for workshops and classes, sometimes I try to make time to make something just 'cause I want to - and this was one of those days!
...
I decided to make a brick house with a slate room - which would make a sweet Welcome to you New Home gift or a Welcome Home gift. You could put cookies or 'We Have Moved' cards inside.
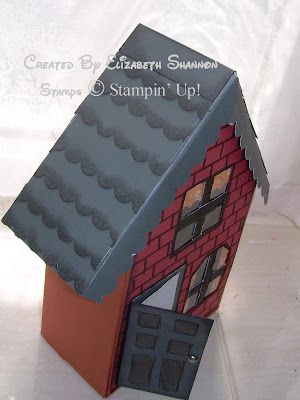
...
First I used really rust cardstock to make the house. The bricks were done in ruby red, drawn in with a black marker. The front door and roof were done in basic grey and the windows - of course - were made with window sheet from Stampin' Up! I also 'hung' DSP paper curtains in the windows. The front door knob is a silver brad. Cuuuuute!
...

...

I made the roof by punching strips of grey cardstock using the scallop border punch. I daubed the edges in basic grey ink to add some dimension to my roof tiles.
...
I hope you like my 'just for me' project!

Friday 21 May 2010

Bright Greenhouse Garden

Hello Everyone

...

Today I am sharing one of the projects I have been teaching at my May classes. Using the beautiful Greenhouse Garden stamp set, I usually use this set with muted soft colours - but not this time! Ready with your sunglasses.... LOL

...

I actually love the vibrant colours on this card - I chose tempting turquoise, summer sun and pumpkin pie and added the second step of the stamp in stazon black ink. The sentiment comes from Bellas Blooms and is punched using the large and scalloped oval punches - my most used punches I think!
...
Our 3D project was going to be fairly time consuming, so we needed two fast cards - and I love the way this one turned out!
...
Hope you like... :)

Tuesday 18 May 2010

Rose Bud Card

Hello Everyone

...

Today I am sharing a card I have been demonstrating at some of my recent workshops. I love the two step bird punch, but was amazed to see examples of it being used to create roses. After a little experimentation, this is the project I came up with.

...

The roses are punched using the wing from the bird punch in regal rose cardstock, which is daubed around the edge in the matching ink to add dimension. The stems and leaves are part of the bird punch and the green over the bud is actually done with the tail of the bird.

...

I used one of the whisper white love notes to create this card, and punched out a 1 & 3/4 circle using the punch. On the reverse I adhered a neat square of vellum cardstock from Stampin' Up! There are all sorts of products in the crafting world to stick vellum, but I have discovered I don't need any of them - my old favourite Tombow adhesive sticks it perfectly and invisibly.

...

I placed a square of regal rose cardstock on the inside of the card, (the side where you write), to show through the vellum circle and finished the card and envelope using three of the sweet Tiny Tags stamps.

...

Do let me know what you think of this project - I love to read your messages!

Saturday 15 May 2010

Another Vintage Vogue Card

Hello Everyone
...
I can't leave this stamp set alone! Vintage Vogue and the Very Vintage wheel has hardly spent any time in the drawer since it arrived - it is either in my workshop and class bag or on my desk! Today I am featuring a card using both items.
...
I started with the base card which is mellow moss, and stamped the little floral swirl from Vintage Vogue using always artichoke ink. Over this I layered a piece of whisper white cardstock, and used the Very Vintage wheel with mellow moss ink to create a background. I also distressed and daubed the edges to give a heritage feel which works really well with this set.
...
The flowers are stamped using pretty in pink and regal rose ink on whisper white cardstock, with one large flower stamped on to vellum cardstock. When stamping onto vellum, you need to allow the ink to dry a little longer than usual, (or blast with a heat gun if you suffer from the impatience gene like me! LOL)


I cut the flowers out, curled them a little using a bone folder to add dimension and they layered them up with brads. Inside the card I stamped the Friends image, also in Vintage Vogue, using always artichoke ink.
...
Hope you like!

Wednesday 12 May 2010

My Sweet Pea Birdie Card

Hello Everyone

...

Can you believe that when I first saw the mini catalogue I didn't even want this stamp set? Of course as soon as I saw some samples from my fellow demos I fell in love with it and tempted that birdie into my craft room.
...
...
The name of the stamp set is My Sweet Pea and features the bird you see above as well as both types of flower. It also co-ordinates with the Sweet Stitches wheel which you can see used as the passion pink and tempting turquoise background. You can even get co-ordinating stitched felt flowers and some of the beautiful papers from the Sweet Pea paper stack also feature these images.
...
You will see a few more examples of this little bird appearing over the next few weeks, so pop back to visit him anytime! :)
...
Hope you like.

Sunday 9 May 2010

Fox & Friends Box

Hello Everyone

...
Today I am sharing a project designed by my lovely upline Amanda. She taught us this project at a recent training event and I adore it.
...

This little box is just the right size to fit in the 3" X 3" love notes and envelopes from Stampin' Up!
...
First we used the jumbo Swirling Stars wheel to stamp the background. I don't have this wheel - but now it has been added to my wish list!
...
We layered up cardstock in pumpkin pie, really rust and whisper white and daubed the edges. The sweet giraffe stamp is from the 'Fox & Friends' set. (Scroll down a couple of posts to see more images from this oh-so-cute stamp set).
...
We finished the project with a thank you sentiment from Tiny Tags, punched out with the matching tag punch.
...
Thank you Amanda - I just love it!

Thursday 6 May 2010

Faux Tear Butterfly Card

Hello Everyone

...

Today I am sharing a card that I taught at a class earlier in the year. It uses the faux tearing technique.


Now anyone who knows me, will tell you I am a neat freak - so although I do occasionally using torn card in my projects - it definitely goes against the grain for me! LOL

...

That is why I like faux tearing - all the effect with none of the edges! This effect is achieved by tearing a piece of scrap paper and laying both edges down on the cardstock, (use temporary adhesive to keep in place). Then using a dauber apply ink in one or two colours along the space you have created between the paper.

...

Before we removed it, we stamped the butterfly image from the A Touch of Nature stamp set in elegant eggplant ink. Once the scrap paper was removed, this is the effect that was revealed.

...

Finally we layered up the butterfly on whisper white and elegant eggplant cardstock and coloured in with markers.

...

Easy to do, but very effective. Leave me a message and tell me if you like it! :)

Monday 3 May 2010

Cupcake Tags

Hello Everyone
...
Today's post is from another special request - this time from lovely Michelle who wanted to see a cupcakes project at a recent workshop.


I used the lovely 'Crazy for Cupcakes' stamp set from Stampin' Up! The one I demonstrated is the pink tag which starts with a piece of Pretty in Pink cardstock measuring 4" X 2".

...

I first daubed around the edge of the cardstock with pretty in pink ink and then stamped the sentiment on the bottom.

...


Next I took a 1 & 3/4" strip of whisper white cardstock and stamped the image on the lower portion chocolate chip ink. I then threaded the strip through the 1 & 3/4 circle punch to create the arch shape. I daubed the edge with close to cocoa ink.

...

I coloured the image using pretty in pink, so saffron and creamy caramel ink and an aquapainter. After adhering using tombow glue, I punched a chocolate chip tab shape, using the round tab punch and used my crop a dile to set a jumbo eyelet.

...

I finished the project with regal rose grossgrain ribbon and the new chocolate satin ribbon.

...

Hope you and Michelle both like my cupcake tags.